


Warren Shephard LNER N2 0-6-2T
| Failed to open database: gaugegu1_gog2 | ret is false |
Originator: Steve Rowe
(Sorry but I have not corrected all spelling and grammar errors on this thread during the editing. There is also a lot of other ‘chat’ on this thread which may make this one a bit disjointed)
thought I would start a thread on my build.
I will update as I proceed and would value input as others may have better ways to do things. Surely the point of forums is to support and encourage.
I started the chassis but decided to spring the front and middle driver so am waiting on cast hornblocks from slaters.
I am using a shogun motor gearbox which has a metric axle only slightly smaller than Slaters 3/16th. I am going to ream it to 3/16 so it will be standard. So far I have built footplate m, bunker and cab floor working towards the smokebox. here is the current state.
Also if you have built this kit then please share your experience.
Mine will be 69523 simply because of the amount of photos and videos that help me get it right

Tony Geary - Nov 27, 2017 at 8:39 AM
A good start! For cleaning up solder, I use emery sticks and I have an old flat file that was broken off and its been ground to a chisel shape. What flux are you using?
Regards
Tony
Steven Rowe - Nov 27, 2017 at 8:46 AM
Tony I make up flux by diluting phosphoric acid.
Some of the soldering is resin core electrical solder using 100 watt iron
I use a needle file like you
i grind it like a chisel.
Sometime even with 188 solder and a 5watt iron I simply cant get the solder to flow.
My big iron has a name
Its called MUVVER
ChrisSimpson - Nov 27, 2017 at 10:02 AM
That's about the state of build when I bought my started kit. I'm pleased to note that the fold down sides of the cab floor are angled in at the rear. Mine was the same and I thought it might be an error, but decided to leave as is. Now I'm glad I did leave it. In the end I had to desolder the entire build because the bunker side corners had been formed badly.
I use Powerflo soldering flux, 145 deree solder and a 48 watt iron. For cleaning up, I have a set of small woodcarving chisels, found in a skip, and ground to different shapes. Also of course I have a few ground down files and the scratch brush.
I'll watch the rest with interest.
Chris
Steven Rowe - Nov 27, 2017 at 10:53 AM
Chris is your a condensing loco?
Mine will be but the kit doesnt have the vents pipes from the tank up the spectacle plate.
The steps are angled as the tanks are wider than the bunker.
I hope I can make this my best loco ever.
I have now got the side tanks parts out ready for folding.
Stay. Tuned for more
Steve
ChrisSimpson - Nov 27, 2017 at 12:13 PM
Cheers Steve, yes it is condensing. The castings were in the box so I used them; a bit fiddly to fix securely. I initially tried glue, but gave up, cleaned them and reaffixed using solder. You could probably form vent pipes from thin tube with a bit of care.

I've got a few bits left, mostly Mignon Model Supplies. The bits I got included a full brass tube for the boiler and a tube for the smokebox. I used the Warren S boiler, because there would have had to be a significant section of the tube cut away anyway to clear the motor, and it seemed a shame to spoil a lovely length of tube. I used the MMS lamp irons as the Warren S ones seemed enormous compared to the drawing. I had to use a tiny amount of filler on the front left sandbox at the front edge, because the sandbox sides are etched very thin, and there was a minor dent which I could not completely remove. There were no pipes for the buffer beams so I used Connoisseur parts.
Chris
Buckley10339 - Nov 27, 2017 at 1:25 Pm
Steve,the vent pipes should be in the kit, they go with the condensing gear only though i have found a photo that shows a non condensing loco with them but its the only one i can find.A phone call to Warren should get the missing pair.
Pat.
Steven Rowe - Nov 27, 2017 at 8:39 PM
I did email Warren
The kit doesnt come with the vents nor the shifting valve.
Steven Rowe - Nov 27, 2017 at 8:44 PM
Chris
A nice model indeed.
I won't add boiler bands but simply allow the lining to do it.
I need to source a snifting valve and some lubricators for the tank front.
I actually thought about the condensing pipes and though a wire dowel in the ends may help.
Regards Steve
Steven Rowe - Nov 27, 2017 at 8:53 PM
Chris I also notice the kit is devoid of boiler washout plugs
There are a few things i need to get.
ChrisSimpson - Nov 27, 2017 at 9:21 PM
It's amazing how quickly one forgets. I seem to remember that there were no plugs with my kit. What I used were some etched leftovers from another kit. If I hadn't had those I'd have drilled holes and made up something using a scrap etch as backing strip, and plugs made from wire, filed up square.
I keep all leftovers from kits, and can often find something to botch whenever something is missing or not suitable.
Chris
Steven Rowe - Nov 27, 2017 at 10:31 PM
Not beyond the realms of possibility to get my mate to print them. The washiut plugs i can make but the snifting valve I need to buy. I also had to buy ross pops too. without opening a well worn debate on kits I would like to think that with wheels motor and some brains I can simply build a simple loco. This is why Him McGeowns kits set the bench mark in my opinion
Steven Rowe - Nov 28, 2017 at 11:29 AM
Further work on N2
Folding up the tanks..Bought some fittings from Laurie Griffin ie snifting valve lubricators and washout plugs non of which were in the kit.
I got a feeling the pressed smoke box door will be devoid of detail and so will source a whitemetal one.
I am a bit dissapointed that fundamental basic components are not the there.
At least it goes together well


Steven Rowe - Nov 29, 2017 at 6:40 AM
The latest on the N2
Going together nicely.
The parts fit well and that to me is the main thing.
There is a youtube clip at this point on the original forum postings
Rossignol21416 - Nov 30, 2017 at 11:09 PM
Steve, Bravo for doing the build live on camera and then publishing it. It’s always better to see the actual operation. Thanks.
A couple of suggestions:
1. I would have cut out the springs with a piercing saw and not snips - it saves having to straighten them afterwards (and avoids any risk of distortion).
2. I stand my flux bottle (and plastic weld bottle) in a suitably sized heavyweight mug - it is almost impossible to knock it over (and I am as clumsy as they come!).
Phil
Steven Rowe - Dec 1, 2017 at 12:39 AM
Phil
Many thanks and Im ALWAYS wanting feedback as I learn so much
The flux bottle is easy to solve but always put it off .
The springs I was lazy and even a slitting disk would have been ok.
The kit builds up nicely but a bit annoyed that so many basic things were not supplied
The smoke box door is a brass pressing.
Comes with the dart but no hinges
Steven Rowe - Dec 8, 2017 at 10:00 AM
Further work on the N2
Footplate and bunker on and tanks.
The boiler has been rolled also smokebox.
The smokebox door is a pressing devoid of details and none provided which is rather strange
The boiler is to long and needs shortening by 5mm.
i didnt realise this and its not mentioned in the instructions.
Not to sure how to go about this seeing as the boiler is rolled.


Jim Snowdon - Dec 8, 2017 at 10:20 AM
Steve,
I would check with Warren before you do anything like shorten the boiler, not least as (a) he doesn't usually make mistakes like that and (b) it is always easy to take metal off, rather more difficult to put it back later if you discover that it is some quaint feature of the design. The good bit is that Warren does communicate and is helpful.
Jim
Steven Rowe - Dec 8, 2017 at 10:34 AM
Chris did you have to cut anything. Off the boiler front.
It seems to long so that the smokebox is to far tforward. pushing it forward of the sandboxes.
Regards Steve
ChrisSimpson - Dec 8, 2017 at 12:20 PM
Steve I think you have the boiler too far forward. There were two boilers in the box of bits I got. One was the Warren S etching which I had to roll, and the other was a tube of the correct length and diameter, ready drilled for chimney/dome etc. There was also a larger tube for the smokebox which was a perfect fit over the boiler. I used the Warren S etch. It seemed such a shame to cut away a lot of the tube to give motor clearance. It would also have been more work. I just took this photo, with the cab roof removed.

As you can see I aligned the rear of the boiler with the rear of the side tank tops. Everything then lined up.
Chris
ChrisSimpson - Dec 8, 2017 at 12:28 PM
I forgot to add that I could have fitted either boiler. Both were the same diameter and both exactly the same length.
Chris
Steven Rowe - Dec 8, 2017 at 8:55 PM
Chris
It seems to me that whoever sold you the kit had collected extra parts.
I have only the warren shepard etches that I had to roll.
The boiler etch has no holes for washouts nor are they supplied in the kit.
The kit was devoid od lubricators, snifting valve and smokebox door dart and apparently these #re not provided.
Also yours smokedoor looks like a whitemetal cast and Warren has a pressing but gain no hinges etc.
Thee boiler has etches to line up boiler bands that also are not in the kit but I wouldnt use anyway.
I rolled the boiler with the etches inside or they will show.
It looks like the boiler should be in line with the very back of the tanktops.
If you check the drawings in the instructions the boiler seems to stop flush the the tanktop at the curve.
The instructions are vague to say the least
Regards Steve
ChrisSimpson - Dec 8, 2017 at 10:26 PM
Steve, I thought that, somewhere else I had said I had bought a started box of bits, which included a Warren S set of etches and castings, but with quite a few parts missing. There were also some parts from a Mignon Model Supplies kit, including a few body etches, and tubes for the boiler and smokebox. There were no parts for the Warren S chassis, nor MMS, but there was a partly built Perseverence chassis, needing a total rebuild. The body had also been started….very badly.
It was a decent challenge, but fairly easy to sort out. Unlike yours my smokebox door was a casting, and reasonably detailed. There were enough parts to build a decent model, and I have left over quite a few etches from the MMS range, a boiler tube and smokebox tube.
Funnily enough, the Warren S, the MMS, and the Perseverence parts all fitted together without any need to adjust parts for length, width or any other dimensional feature…….very strange. All seemed to conform to the drawing set very well.
My body build is essentially Warren S, and is comparable to yours. I did not have to shorten the boiler, just line it up iaw the Isinglas drawing. I expected to have to scratchbuild some parts, but got most of the build completed without any problem.
There were also two sets of Premier rods, one of which I donated to Rob Pulham for the N2 he is about to build.
Chris
Steven Rowe - Dec 8, 2017 at 10:43 PM
I also have the premier rods. it will go together and fairly well .
What i have built is good and i am so glad Ihave the Isinglass drawing.
Iam waiting on some parts fro. Laurie Griffin including washout plugs.
I cant fit the boiler yet as I need to fit washouts first as there is a brass strip going across the tanks so will never be able to solder or fit if boiler is soldered.
Regards Steve
ChrisSimpson - Dec 8, 2017 at 10:51 PM
I fitted the boiler long before I fitted the plugs. No problem.
Steven Rowe - Dec 9, 2017 at 1:22 AM
Finally soldered boiler to smokebox.

Looking good.
Steve
Steven Rowe - Dec 9, 2017 at 4:59 AM
Well this is interesting
even with boiler lined up with back of tanks the smoke is 4 to 5mm to far forward
Not to sure how to resolve this.
Have sent this to Warren too.
(Youtube clip here on forum thread)
ChrisSimpson - Dec 9, 2017 at 9:33 AM
Hello again Steve, you are having a time of it. Keep persevering.
I dug out a photo of mine part built.

If I remember correctly, everything on this photo is from the Warren S etches, except the chassis. I had no trouble with the alignment of boiler and smokebox. After this stage I made some minor changes to fit better handrail knobs, but otherwise it's as this photo shows. It's a trifle high at the front because it's just plonked on the chassis. I fitted lamp brackets from the MMS etches I had as they were the correct (according to Isinglas) size, whereas the Warren S ones were much bigger.
For Pat, there were instructions, but not much help.
Chris
Steven Rowe - Dec 9, 2017 at 9:43 AM
Chris
Im confident it will go together well.Just a few things not fully clear.
As I said the kit is not complete,ie there are basic things that should be in the kit but arent.
The front frames extentions have two types, which ones did you use?
Steve
ChrisSimpson - Dec 9, 2017 at 9:54 AM
Front frame extensions? Need to be more specific as to which parts you are interested in. If you are meaning below the footplate, my box of bits had no Warren S chassis parts at all. I have a Perseverance chassis. If you mean the visible front frames above the footplate, there were only one set.
Mine is a bitsa, but it went together fairly well. It's not in the league of a more modern kit, basic but competent. I would not claim it to be my best build.
I used the Isinglas drawing, and selected a photo of a particular loco from my copy of Yeadons Register, and tried to replicate that photo. There are umpteen variations of handrail and washout plug positions, lubricator and pump locations etc.
Chris
Stelfox22047 - Dec 9, 2017 at 3:44 PM
Having just watched the video - it would be easier to file back the tank crossbeam a few mm so that the boiler slides' back into the correct position. Much less fiddly than trying to extend a slot in the rolled boiler
Malcolm
ChrisSimpson - Dec 9, 2017 at 4:07 PM
Following on from Malcolm's post, there was no tank crossbeam in my 'kit', so I assembled the loco without that part and added a simple crossbeam where it would fit, after permanently attaching the boiler. That may be the issue.
Chris
DavidL - Dec 9, 2017 at 4:27 PM
I'm getting confused - it sounds like you chaps are talking about two different kits!
David
ChrisSimpson - Dec 9, 2017 at 6:12 PM
David to clarify!!.
I bought a started 'kit' which I discovered included most of the etchings and all of the castings for the Warren S N2, but there was no chassis. There was a Perseverence chassis, built but needing rebuild. There were also some parts from the Mignon Model Supplies N2 kit (very old) and a tube boiler, presumably obtained whenever the MMS kit was purchased. There were also two sets of rods.
I recognise virtually all the parts from Steve's kit. The cross piece Steve mentions was shown in one of the drawings that came with my kit, but was missing. We are talking about the same set of parts, but we both seem to have had part kits, not whole. I bought mine from a friend, knowing I was getting an old partly made, and probably incomplete set of parts. It turns out that I had enough parts by combining both kits, and now I have left over parts.
Shortly after undertaking my build, E & T had a Perseverence chassis kit for sale, and I nearly bought it, thinking I'd be able to build another loco, using left over parts, and parts copied from the Warren S etches. In the end I didn't buy it. I believe there was also a MMS body kit in E & T which I didn't buy either
Now I'm sure that clarifies it all for you!!! He He.
Chris
RobPulham - Dec 9, 2017 at 6:39 PM
No that was me, I also have a Warren Sheppard kit but I guess I will be taking a similar route to Chris when I get to building it because the body will be MMS, the chassis will be the spare WS one that comes in his kit, Chris kindly donated a spare set of rods and Warren sold me a set of castings. I will just need to be carefull to chose two prototypes that had the two slightly different chassis.
Steven Rowe - Dec 10, 2017 at 6:57 AM
Finally making headway now and sorted out the boiler.
I feel inspired now


There is another youtube clip at this point on the forum thread
ChrisSimpson - Dec 10, 2017 at 9:04 AM
Glad you are making progress, and that the boiler fits at last.
I see what you mean about the frame extensions now. My 'kit' only had the short extensions, and if I'd had a choice, I'd have used the short ones anyway.
Well done.
Chris
Steven Rowe - Dec 10, 2017 at 9:17 AM
Thank Chris
I simply wasnt going to use the long frames as I could run into problems.
Apart from adding thr spectacle plates and making a removable roof then i just have to fit out the body.
Regards Steve
Steven Rowe - Dec 10, 2017 at 10:03 AM
The Dome for the loco has pitting on it.
So what do I do.?
Can I fill it ready for painting or contact Warren for a replacement?

Neill15028 - Dec 10, 2017 at 10:10 AM
I had one from a discontinued kit (about same condition) with no prospect of replacing - fitted and sprayed with a filler primer from Halfords - sanding down between coats - came up fine but took a couple of weeks as it has to dry/harden before sanding. I wouldn't do it again if I thought I could find a replacement!!!!
Steve
paul copsey - Dec 10, 2017 at 10:52 AM
You could use a filler then sand back and prime which will highlight any bits you missed which you will , then do it again. It will come up okay .
Buying a replacement is easier .
Cheers Paul
Bob Alderman - Dec 10, 2017 at 11:18 AM
I'd use white Milliput smeared on with spit. Maybe a couple of goes.
I've found it sticks well even when very thin.
Bob
Stelfox22047 - Dec 10, 2017 at 11:25 AM
The pitting is due to silicone spray being used in the mould to ease removal. The wise manufacturer would discard the first 3 or 4 mouldings which will remove the excess silicone. Lost wax castings which have this effect is due to the wax mould being sprayed and the pitted waxes are then cast.
If you use the dome, make sure you wash it well first as filler and u/coat may not stick very well.
Malcolm
Jim Snowdon - Dec 10, 2017 at 12:00 PM
Certainly, you can fill it and make good the defects, and a lot of 7mm modellers would do just that and say no more about it, regarding it as just another of those “fettling” jobs, and leaving the manufacturer no wiser (and in some cases, just continuing to turn out the same second-rate components).
Given where you are, getting a replacement is not so straighforward, but at the very least I would contact Warren and let him know. As customers, we have a reasonable expectation to revieve good quality; for the same reason, any manufacturer does have a responsibility to prove good quality components.
Jim
Shephard5287 - Dec 10, 2017 at 12:23 PM
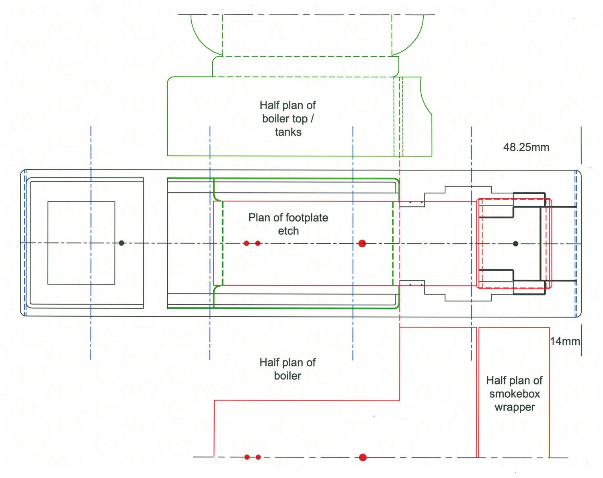
I have done some checking of the etches as Steve seems to be having problems. Checking all the known dimensions [wheel centres] etc to a scan of the Issinglass drawing, then I super imposed the etch dimension [outline] for the footplate, tanks and boiler to check their accuracy. I have sent Steve copies of the two drawings produced, will upload if I can suss out how.

Regards the dome, I have checked out what stock I have and they are beautiful [have offered to send a replacement]
Warren
Steven Rowe - Dec 11, 2017 at 12:55 AM
I contacted Warren who is always very helpful.
He said he would send a new one or I could fill with milliput.
So I used 5 minute araldite to glue the dome on.I then filled the pits and cleaned up so all good.
I thought I would try this first and so no need to wait for a new one.
Steve

Steven Rowe - Dec 11, 2017 at 7:56 AM

Ok a question
once I finish the N2 in mixed traffic livery I need to line the front splasher and sandbox with a simple red line.
I have a bow pen anc can draw simple lines but am no Ian Rathbone
just wonderung if I should make a templare before fixing the part.
Also the tool above is a three edge scraper.
It is an expo tool and I have snapped the blade at both ends.
Can spare blades be bought.
I cant even find the tool online
Regards Steve
Sandy Harper - Dec 11, 2017 at 8:39 AM
Steve,
A simple template made from plastikard should suffice to draw a single red line with a bow pen. They are not really designed for drawing sharp curves but, if you are careful…..! The trick is being able to repair defects in the line aftewards using Ian's technique of the white spirit dampened OO sable brush!! Oh, and use Gloss enamel paint throughout.
If you need scrapers to remove excess solder, grind old files/screwdrivers to whatever shape you require, but be careful as they can damage soft brass. It is better to make scrapers out of brass scrap, less likely to inflict damage on your model.
Regards
Sandy
ChrisSimpson - Dec 11, 2017 at 9:16 AM
The scraper is on page 97 of the Squires catalogue.
Better to do what others suggest, grinding up old files, hacksaw blades, etc.
You must have been leaning a little too hard to break the blade. i have one of these, and it's bomb proof.
And well done to Warren for being quick to help.
Chris
I just came back to add, it's £6.99 from Squires, and one is available from ebay at only £18.99. Makes you think.
DLOS - Dec 11, 2017 at 10:37 AM
Steve, May I humbly suggest that you have been applying rather too much force if you have done this removing solder. from a 7mm model. The technique is to scrape away gently, a little at a time, until the underlying brass or nickel silver is reached; this way there is far less chance of removing scrapings of brass. It does take time. David
DavidL - Dec 11, 2017 at 12:42 PM
I find brass is too soft; to be effective, a scraper needs to be sharp, and brass loses its edge in no time flat*. As for cobbling together scrapers from old files and screwdrivers, whatever floats your boat, but I've always found it uncertain of outcome and too much trouble (despite being well equipped for tool grinding).
*Bronze would be better; might try it sometime. But I don't find a problem using hardened steel….
David
Steven Rowe - Dec 12, 2017 at 8:10 AM
Today I detailed the smokebox door.
The door is a pressing and comes with a dart.
I had to make hinges and straps.
I used Phisphor bronze strip soldered to brass tube.
The tube was cut and wire thread through.


Also had to find a small knob for the 9 oclock position. I made some destination brackets but they are ok but not brilliant.
Steven Rowe - Dec 12, 2017 at 12:39 PM
some if the challeges I face are being si far away and being around others who build rather than rtr..Also everything is posted, I cant wait fir a show knowing that I can get all the bits I need.
steve
Steven Rowe - Dec 13, 2017 at 1:15 AM
Managed to get one of the splashers on.
The parts fit very well.
Biggest problen is not enough hands

Regards Steve
Steven Rowe - Dec 14, 2017 at 11:21 AM
Chris,
Im about to start the cab roof and wonder how you made yours removable.
Steve
ChrisSimpson - Dec 14, 2017 at 12:20 PM
I'm sorry the photo is a little (or rather a lot) out of focus, but you can possibly see how I did it. I fitted two strips of scrap etch to fit inside the bunker fronts, and keep the rear of the cab aligned. I fitted two wires in the front corners, and distorted them slightly so they are just tight enough to keep the cab from falling off. 4 wires would have been neater and less obtrusive, but it would have needed me to plan that and drill holes during the appropriate stage of assembly. As it was I decided a removable roof would be best, after I'd finished the body.
If you can't make it out I can try to do a better picture.
Chris

DavidL - Dec 14, 2017 at 12:45 PM
On my J71 (the first “proper” loco I made) I elected to make 68275 - the last one in service - which also had one of these crank boss splashers. I tackled it by a somewhat brute force method of turning a piece of brass of the correct diameter to produce the rim, then using a parting tool to cut away behind the splasher, and cut off 4 slices with a slitting saw. I appreciate this is not possible in the absence of a lathe (or a friend with a lathe!) but if you do it's a relatively painful method. Well, I say painful, but it does rather pain me to see how much swarf you make on jobs like this!


I think, from memory, I may have glued the little splasher in place to avoid risk to the soldering behind.
David
ChrisSimpson - Dec 14, 2017 at 7:16 PM
Steve another (out of focus) photo for you. This is my N2 in build, The crank boss splasher side plate is a fold up from the footplate. It looks like yours is a separate part which you had to solder in position. You can also see how the Perseverance chassis is organised.

Chris
Steven Rowe - Dec 15, 2017 at 12:48 AM
I need some help with the cab roof.
Youtube video clip on original forum thread here.
Steve
Steven Rowe - Dec 15, 2017 at 11:37 AM
The N2 takes shape
The cab folded up nicely.

Steve.
DavidL - Dec 15, 2017 at 6:31 PM
To add to Malcolm's excellent photos, let me add a couple of my own which might be useful.


Hope they help.
David.
Steven Rowe - Dec 15, 2017 at 8:51 PM
Thanks for the images of the N2. I chose 69523 because of good quality images and videos, also it was a 34A loco so worked the widened lines.
Everytime I look at it I find something new.
I notice that it only has one tank vent pipe not two, although in BR days it. Had two.
I have bought the little lubricators on the sandbox fronts.
I want to add the injectors near the steps and some of the pipe work.
Has anyone got any good cab shots please.
I think this will be the best model I. Have made as far as being a better modeller.
Im working up to do my Finney kits justice.
Overall the Warren Shepard kit is good. The etched parts fit very well.
For some reason Warren doesnt supply some basic parts such as snifting valve and whistle.
I think they should be included as they fundamental to building an N2.
Probably more important to me as I cant get to shows by train or car .
Its a 21 hour plane trip from Sydney to London.
Regards Steve
Stelfox22047 - Dec 15, 2017 at 10:37 PM
Looking at David's photo's it shows a guard iron being held on by one bolt so its obviously being 'worked on' Perhaps the R/H vent pipe is off as well. The NB Loco Co. built this engine with condensing gear & 2 vent pipes in 1921 for the GNR. Adding the fine detail is what brings the model to life. I'll see what I can find on cab detail, I believe is was very similar to the Ivatt J52/2 cab but will check with the GNR Society
Malcolm
Steven Rowe - Dec 16, 2017 at 9:57 AM
have added the chimney and saftey valves.
Also added the tank beading.
I made the roof removable.
I added a brass L shape bracketthat is soldered to the front spectacle plate.
It sits on the top of the boiler in the cab.
This was drilled and so the cab roof is bolted to the boiler.
Access is via the open front roof vent.
On tbe rear spectacle plate I dtilled two holes at each side and soldered two dress makers pins..
these fit in brass tube that is soldered to the bunker sides.
See photo


Turnbull21603 - Dec 16, 2017 at 12:26 PM
Hi Steve,
I use dressmakers pins for all sorts of fixings wher a rivet head would normally show. As an example I use the for attaching brake shoes to brake hangers.
Dressmakers pins are are approximately 0.5 mm diameter.
Les
Steven Rowe - Dec 16, 2017 at 9:37 PM
Hello Raymond
Thanks for your comments.
I pondered this thinking how i can fix the roof.
Firstly I thought I dont like the spectacle plates not being soldered but this type of roof make it difficult.
The. Kit comes with two rear spectacle plates, one has round windows.
I actually thought of a real cunning Baldrick plan.
If I had a another front plate I could solder up the roof as I have done except slighty inboard of the front and back the thickness of a spectacle plate.
Then solder the proper spectacle plates on the boiler and bunker.
The cab roof would now be a simple push fit. The front spectacle plate would not need modifying but the rear one would need cutting with a slitting disc so that the rear windows showed.
I am endeavouring to make this my best loco ever, forever looking at the work I have done and thinking is this the best I can do, or should I say no, not happy, fix it.
I really on this forum as being here in Aus I dont have the local support that you blokes do in the UK.
I. Know 3 other O gaugers here who are great.
Im always looking for feedback an ideas .
After this loco i have a J17 and a 57XX to build.
I then need to beat the ACE C1 with a large club hammer or conquer it.
i then have three Finney kits, an A4. A3 and a V2 which I should hopefully do them complete proffesional justice.
Regards Steve
Raymond Walley - Dec 17, 2017 at 11:21 AM
Well, at the rate you progressing, your Finny's should be superlative.
Stelfox22047 - Dec 17, 2017 at 5:13 PM
To get back to the N2 - herewith 9 pictures of the cab taken by Steve White of the GNR Society when he did a drivers course on 1744. They are relevant to this model as its the same loco but in BR livery. Might seem a bit like overkill but just about all the detail is there. I've just started a Finney A4 (a Christmas present to myself) but with the amount of rivet bashing to do I don't expect any result till Easter.
Regards
Malcolm


Steven Rowe - Dec 18, 2017 at 9:15 AM


doing so well today and added cab beading and corrected the rain strips that I soldered on I then started handrails and tank fitting then DISASTER. The tip of my very hot iron fell out and melted the carpet. Oh expletive.
How am I going to tell er in doors. I havet told her yet. Shall I wait till Christmas day???
ChrisSimpson - Dec 18, 2017 at 12:12 PM
Steve you asked if my condensing pipes were all whitemetal; yes they are, and they soldered together quite nicely using 70 degree solder.
I can't make out from your photo how you fitted the rainstrips, but I found them quite awkward to get right, working from photos in my copy of Yeadons Register.
Chris
Steven Rowe - Dec 19, 2017 at 8:31 AM
More work on the N2
Got the condensing gear on.
I cant fit the tank fillers they are way to wide
For some reason the spectacle plate seems wrong.
The windows to my eye look to small.


Steven Rowe - Dec 19, 2017 at 10:48 PM
Looking at previous pictures the spectacle plate windows just dont look correct.
I made up a template to prove my theory but now dont know if i should try and change it or leave it as is.
Regards Steve
There is a youtube video clip here on the forum thread
Arun Sharma - Dec 19, 2017 at 11:15 PM
Steve - looking at the pics in Vol 9A of the RCTS Green Book, the template you have drawn looks much closer to the real thing than the spectacle plate that you currently have on your loco. Go for it!
Arun
Steven Rowe - Dec 19, 2017 at 11:23 PM]
Arun many thanks for your opinion.
Yes I looked at the Greenie too and also looking at video of it running the window seems much larger than the etch.
Im not to sure how to go about this.
I could add a decent black marker and scribe the lines and then file out, but being patient and careful would be necesary.
Its like scratch building.
Also my Jim Mcgeown J50 has a similar problem in that the round windows look to small.
Steve
Arun Sharma - Dec 20, 2017 at 12:35 AM
Steve - On the basis that your template is pretty good, I would make a new spectacle plate.
First transfer that design to a scrap piece of brass with a fine felt tip pen or soft pencil. If you are happy using a piercing saw, I would suggest drilling a 1mm hole just [B]inside[/B] each of the four corners of each of the two spectacle holes, inset the saw blade through one of the holes and slowly cut around the pattern keeping to the inside of the lines you've drawn.
Finish off with fine files.
If you're not used to using piercing saws, this is actually a pretty good self-teaching exercise - at worst you waste a couple of square inches of brass - at best, you learn a new skill and get a spectacle plate that looks better.
Aun
Steven Rowe - Dec 20, 2017 at 4:40 AM
I knew the N2 spectacle plate looked wrong.
Just having a good eye and realising that the outline of the window followed both the roof line and also the boiler line and it clearly didn't.
This very much ruined the look to me.
Using a pair of dividers I scribed the outline on the spectacle plate and filed down to the score.
Had to keep checking.
Well it took about 45 minutes and the results speak for themselves.
Perhaps many locos you would get away with it but it was very much a NER practise that Gresley adopted for most of his locos and it simply is a signature of a classic Gresley engine


Steven Rowe - Dec 20, 2017 at 10:05 AM

I must admit I thought i might ruin in. I thought what would a pro do. In the end I thought I have nothing to loose if I wreck it ax I will do as you suggested and scratchbuild one.
I have now added the vent pipes from copper tubing.
I had to anneal it so it would bend.
Cheers Steve
Steven Rowe - Dec 21, 2017 at 6:47 AM
Today I added lamp brackets at smokebox and bunker ends.
Also tank handrails on tank sides plus added the coal rails..
I made up the tank vents using copper tube,thus was annealed so it bent easily.
I think the kit is very sound and easy to assemble
It makes me want to get the quad arts going.


Steve
Steven Rowe - Dec 21, 2017 at 9:16 PM
I am constantly scrutinising it to see if its good enough.
The fit of the cab im not 100% happy with. And then adding as much detail as possibl that actually show such as steam injectors and a few lubricator pipe runs.
Of course a solder free unblemished surface is required.
The painting and lining is one. area that can mzke a good build look terrible.
Steve
Steven Rowe - Dec 28, 2017 at 10:11 PM
The N2 continues..
The rear drivers fouled the cab floor.
I reversed the bearings.
The driver then was very tight so a bit of filings both bearings the same amount of strokes to get the space between back of wheels and frames equidistant.
Took about three attempts and now drivers turn


but virtually no side play. .
Raymond Walley - Dec 29, 2017 at 4:14 PM
You don't need side play on them if they are fixed as your driving set so long as they revolve freely, you can have side play in the others instead.
Steven Rowe - Dec 29, 2017 at 9:41 PM
Raymond yes your correct.
I really need most side play in the centre driver.
The leading driver has to much play as a wheel can touchyhe body.
I will pack out to reduce side play..
I then run into another problem, the front of the chassis is abot 2.75 mill higher than the back.
It looks ok until uou realize the buffers sit to high.
I have taken out hornguides and scribe a horizontal line on the frames at the rear driver centre.
I now need to rejig the chassis ensuring the axle centres line up with the dayum line.
I am now beginning to feel like an unprofessional bodger and hack.
Well its times like this to have a good sleep and with a fresh clear head GET IT RIGHT.
Steve
Jim Snowdon - Dec 29, 2017 at 9:54 PM
Steve,
You might be surprised at how little sideplay you really need, especially if you are using 32mm gauge track. What's your minimum radius?
Where to put such sideplay as you do need is always a good question, as the answer is not always the obvious one.
Jim
Steven Rowe - Dec 29, 2017 at 11:23 PM
Jim
My minimum radius is 6ft.
Yes your right about 32mm finescale tolerance.
I can take some side playout the front and give more on the middle axle.
If only I had the kit builders crystal ball to see every problem.
That I suppose comes with time and loads of kits.
I would like to build my Finney kits so the simoly ooze Rathbonian quality.
Steve
ChrisSimpson - Dec 29, 2017 at 11:50 PM
Concur with Jim. My N2 has virtually no sideplay, but manages 6 foot radius no bother. The pony truck needed end stops to prevent the wheels touching the chassis frames.
Chris
Steven Rowe - Dec 29, 2017 at 11:54 PM
Chris
Re the pony
The frames have a seni circular cut out for the pony; but the pony truck is a nice fold up box.
Did you rebate the frames to taje the square oony truck?
Steve
Jim Snowdon - Dec 30, 2017 at 12:14 AM
Steve,
If you assume zero sideplay on the first and third axles, the sideplay on the centre axle would be 0.9mm, if the wheels were a dead fit in the track, which they aren't. On 32mm gauge, there is roundly 1mm sideplay between the wheels and the rails, so in essence, the track would give you all the sideplay you need. I learned that on my second 7mm locomotive, a Finney GW Dean Goods that had next to no sideplay to start with, but happily went round the corners.
Looking at the problem the other way up, with 32mm track and +/-0.5mm sideplay on the middle axle, the minimum curve the chassis would go round would be 3' 6“ curve, which is rather tighter than anything you would be contemplating.
Given that, my suggestion would be to put 0.5mm sideplay on the centre axle only. That will get you round a 4' 6” radius, which is what you would encounter if you ever used a Peco curved turnout (not that I would particularly recommend them).
Jim
Steven Rowe - Dec 30, 2017 at 12:37 PM
i built the basic chassis and found it was riding to high at the smokebox.
Had to pull out the hornblocks and cut out more using a datum line scored from the fixed driven axle.
Even though the chassis doesnt bind when pushed I found the motor has issues.
It is a Tower Models shogun motor, brand new but bought 5 years ago.
Firstly when you turn the flywheel there is a delay before the axle moves.
I pulled the motor out and find there is a regular binding at low speed.
This is really odd and I think it is the meshing between worm and pinion causing the problem.
Bob Alderman - Dec 30, 2017 at 1:04 PM
Steve
Probably not a meshing issue due to gear centre problems.
Have a look at the gear teeth. Are some of them contaminated with something that is gagging the mesh?
As it appears to be a once per rev on the axle look at that pair of gears.
I will add that if the mesh is contaminated then scrape the muck out with a pin. A blast of aerosol ipa can help but if you do let it dry then relubricate.
Check too, that the ends of the teeth have not been damaged at the ends of the gear. Gentle work with a file between the teeth will remove the burrs.
Bob
Steven Rowe - Dec 30, 2017 at 1:12 PM
Bob
Got to be worth investigating.
I might run it and spray some electrical contact cleaner then lubricate
Jim Snowdon - Dec 30, 2017 at 1:37 PM
Since it occurs at roughly the same spot in terms of the rotation of the final drive gear, the starting point for any investigation would have to be the interface between it and the intermediate pinion driving it. Up to that point, all seems to be well as the motor goes through many revolutins quite happily.
There will always be some delay between motion at the motor shaft and the final drive gear due to the play that exists between all of the gears. As long as it is not excessive, it isn't anything to worry about.
Jim
Steven Rowe - Dec 31, 2017 at 3:08 AM
Finally got the N2 chassis rolling.
Had some issues.
Firstly had to rejig the chassis as it was sitting high at the smokebox. It then wasnt running
well and yet it ran ok without a motor.The Tower models shogun gearbox had a few tight spots.
I now have put in an ABC Maxon powered mini box. The rolling roads which I only just got were binding.I notice they rub on the frame.I put on the back of the screws 1/8th fibre washers and they now turn freely. Dont know how they are supposed to turn if the rollers are touching the frames.
I did flush out the shogun gearbox with contact cleaner and re oiled. It still has issues.
I am not 100% happy with the running of the chassis. Perhaps i should just do out the box stuff.
Buckley10339 - Dec 31, 2017 at 8:48 AM
Steve,that little Shogun is not really up to the job for the N2.I have just remotored a connoiseur J69 with one that i have had sitting around for a few years its been tried in other locos and found wanting. However its okay in the J69 which is quit a small loco. Leave the ABC/maxon motor in its much better for it. The general rule that i work to is to fit the most powerfull motor possible in anything that means a large motor running with plenty of reserve power if needed. If you apply a motoring comparison you wouldnt fit an old mini engine in to a Range Rover and expect it to be the same would you !
I learnt this from a profesional 0 gauge builder when i was still doing 00 as well he was doing demos at a show i had my layout at and i picked his brains shamelessly.
Pat.
Davenport20954 - Dec 31, 2017 at 6:18 PM
In addition to running on a rolling road give it a try on a length of track. It helps synchronise the un-driven axels which, on a rolling road, rely on the coupling rods. If these are a little lose the wheels may run a little rough.
Do not give up and head for RTR just yet. You will get immense pride when the loco is running in its new livery and you can say it is all your own work. Then maybe add a RTR for company!
David
Jim Snowdon - Dec 31, 2017 at 6:49 PM
Pat,
I have no wish to put Steve off, but that little Shogun is a Canon 1833, which, coupled to various ABC gearboxes, does the locomotives of several of our club members very well. Those locomotives include several 8-coupled goods engines, none of which have been strained when hauling around upwards of 30 wagons. So, to borrow your adage, whilst I might not put a mini engine into a Range Rover, I see no purpose in putting a Range Rover engine into a mini just for the sake of it. The motor and gearbox should be sufficient to perform the tasks demanded of it, and anything over that is just waste.
The Maxon/ABC combination will work just as well, so I would leave it there, especially as there is something patently amiss with the gearbox on the Shogun.
Jim
Buckley10339 - Dec 31, 2017 at 8:40 PM
Jim.i did try the shogun in a fairly large loco which is what it was got for and i was so dissapointed with it that it was removed quite quickly.The cannon motor is excellent but the gearbox is very substandard nowhere near the quality of an ABC.and of course its just a normal worm and pinion.Of course an ABC with a cannon will haul 30 waggons i would be concerned if it didnt but the shogun wonnt .Its now in the J69 and hopefully will be better than the well over 20 year old Mashima. Pat. Jim nearly forgot to say,my Scorpio Britt is getting a cannon and ABC gearbox and i fully expect it to haul my modified rake of ten heavy limas if it doesnt there will be trouble at mill and searching questions asked !
Jim Snowdon - Dec 31, 2017 at 9:31 PM
Pat,
I hadn't appreciated that the Shogun was based around a worm drive from the motor and had assumed that it was much the same as the very similar looking motor/gearbox that was used by Fine Scale Brass. That uses a pair of crossed helical gears as the first stage, as do the ABC boxes.
I had the wisdom of using ABC gearboxes confirmed a while back on the little GWR 2-4-0 that was the recipient of the little 2000g tender that featured in the last My Workshop thread. That originally had a Mashima coupled to a fold up worm gearbox, and had a rice pudding index of about a half, ie not a lot. Conversion to an ABC gearbox (not a simple task given its small size) transformed it and would, these days, give it an RPI of about 3. The motor is the same - the difference is in the much greater efficiency of the gearing in the ABC 'box.
Jim
Buckley10339 - Dec 31, 2017 at 9:50 PM
When i get rid of my current dose of man flu and am allowed to go and play in my workshop i will put a lot of wagons behind the J69 and see how many it will pull.I am not expecting more than ten or twelve.If it pulls my quint set and my rake of three kirk/ scratchbuilt twin sets i will be happy with it.
Pat.
Steven Rowe - Dec 31, 2017 at 9:57 PM
jim
I ran the shogun on the rolling roads for about an hour in each direction and it seems to have settled down.
It is true the maxon minibox is such a beautiful bot of kit but what i have decided is to suck it and see.
Will leave the shogun and if no good will change it.
This is now easier has the shogun now has a standard 3/16th axle. A mate of mine with a lathe reamed the pinion and the gearbox bearings from metric to imperial.
Jim Snowdon - Dec 31, 2017 at 10:02 PM
Glad to hear it.
I would wish you a Happy New Year, but you're rather ahead of us :)
Jim
Steven Rowe - Dec 31, 2017 at 10:11 PM
Thanks Jim
Yes its 9am here and 10pm in the UK.
Had a lovely NYE.
A beautiful night, very quiet and we got in the spa till midnight.
I have ceased drinking alcohol and now prefer other studd like sparkling mineral water.
At least i don't feel like i want the earth to swallow mw up and I can go work on my chassis.
Have a freat NY and want to say a big thanks to you and everyone else for all the advise and wisdom you have given me.
My models are better because of this.
Its good now I have found another member here in Aus.
Paul Copsey is almost a neighbour, its only 900 klms to Melbourne.
If I get in the car now at 9am i can be in Melbourne by 7pm roughly
Steven Rowe - Jan 1, 2018 at 3:09 AM
Decided to look at the brake rigging.
Got everything off the frets checking against the parts list.
It has brake hangers that look rather good but no brake shoes.
I have checked all the fret diagrams and inventory., I find it rather. Strange.
I wonder how I can make a reasonable brakes shoe.
Turnbull21603 - Jan 1, 2018 at 7:51 AM
Steve,
Springside Models, located in Cornwall, supply plastic brake shoes, there details can be found by looking at the traders section of this website.
Warren Shepard can also supply these, if he has any in stock.
Les
Steven Rowe - Jan 1, 2018 at 10:13 AM
Hello Les
Had a look at the Springside ones on Warrens site. The springside ones are the hanger as well.
The hangers for the N2 are nice bur strange the kit doesnt have the shoes.
I just had a cunning plan, I can simply shape some out of plastikard and attach them to the brass hangers.
Steve
Bob Alderman - Jan 1, 2018 at 8:30 PM
Um? I wonder if you have a legacy of that work in the stiff spot?
The reaming of the pinion may be slightly eccentric. How tight does the axle feel in the bearings? Less final drive gear attached.
Are there any burrs on the holes?
Not saying your mate hasn't done what you asked but may have missed something.
Bob
Steven Rowe - Jan 1, 2018 at 8:43 PM]
Hello Bob
That crossed my mind too but checked that.
Actually my mate is one of those uncanny blokes who is so precise in everything.
He has just finished a 1400XX and it is so freaky to watch running, its almo like it is real.
I actually ran my chassis on rolling roads for a few hours and it seems much better.
I also cleaned all the gears with an electrical contact cleaner and re oiled it.
I did this because when he reamed the bearings the gears were in close proximity.
It was done on a lathe and i dont think he actually turned it on, it was turned by hand as the difference in axle sizes is so small.
Of course the lathe also kept it all square.
Steve
Steven Rowe - Jan 1, 2018 at 8:55 PM

I am now working on the brakes.
I just need to make some brake shoes as the kit doesnt have any.
It has nice vrake rigging ie pull rods etc and two peice brake hangers but no brake blocks which I find odd.
I think Im going to make up a small template then cut some from some plastikard.
Whilst the kit is lacking in some areas the component quality is good and I would certainly buy another one. Somethings are a bit old fashioned and were designed for motors and single pinions.
Jim Snowdon - Jan 2, 2018 at 10:14 AM
Steve,
Although it may be one of Warren's older kits, it is quite possible that it was meant to come with a set of moulded plastic brake blocks. As it is, if you can stand the postal delay, both Slaters and Springside do plastic brake blocks.
Otherwise, as you say, it's going to have to be a case of improvisation.
Jim
ChrisSimpson - Jan 2, 2018 at 10:32 AM
Steve, mine came with cast brake hangers and brake blocks, but I don't know it they were original to the kit. Warrens list of castings don't seem to include N2 brake parts, although they may be common to another loco. For other models I have made plastic brake blocks, starting by cutting out a circular ring very slightly larger dia. than the wheel (about 1mm), and wide enough to make the brake blocks from. I then cut out brake block shaped pieces from the ring, and added detail using other small plasticard pieces. An advantage is that plastic brake blocks can be allowed to get very close to the wheel, with no risk of shorting. I would just make some rather than await an order.
You must be nearly there now. Chris
Steven Rowe - Jan 3, 2018 at 5:28 AM
Chris
I just feel I get hamperred by little things that halt progress but I guess this is good for patience..
I ordered some slaters ones as Jim suggested.
Also the body is on hold as Im waiting for parts.
I think what will do is pack everything away and do more work on the Easybuild BSK I am building.
So far got the sides and bogies finished so will make up the chassis.
Steven Rowe - Jan 3, 2018 at 9:32 PM
Making up the pull rods was easy this time.
I must admit when I look at anything i do I always feel like a bit of a bodger after working it on it .
I am probably way to hard on myself though.
Steve
Steven Rowe - Apr 30, 2018 at 8:49 AM
Further work on the N2
The chassis has been completed and now primed.
Next step is to finish the paint then reassemble and test.
I need to buya tcs decoder for it
Youtube clip here on forum thread
End of Thread
