


Prusa Mk3s 3D Printer Review
Chris Free
And some thoughts on 3D design and print generally
Prusa Research S.R.O.
Partyzanska 188/7A
17000 Praha
I have been using 2D CAD for model railway projects for many years. However, it can be a bit tedious and long winded to convert 2D drawings into 3D objects so I was very interested when 3D printers aimed at the home hobbyist became available.
A careful reading of online reviews led me to the conclusion that the best option would be a Prusa Mk3s. I could have saved several hundred pounds buying a cheap far-eastern clone but I have had poor experiences with electrical equipment from this source; cheap and nasty components, unreadable instruction manual and no after sales service being typical.
So, I sent off my hard earned cash to Prusa Research and in return received a large box containing the components beautifully packed, all the tools needed, a comprehensive assembly manual and 3D printing guide, a USB stick containing sample objects to print and various software programs, a kilo of silver grey PLA filament and last, but not least, a packet of Haribo Bears.

The assembly manual is a joy. Very well written in excellent English and copiously illustrated in colour, the process is divided into simple, logical steps and the components and fixings are clearly labelled by stage (Figure 1). There are strict instructions to take a breather at the end of each stage and eat one or more of the Haribos!
 Figure 1
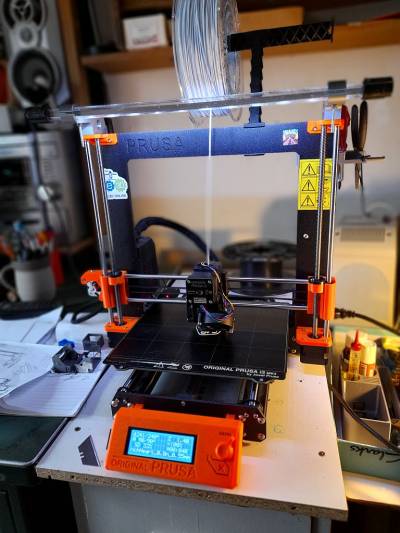 Figure 2
After a few evenings work you end up with a fully working 3D printer (Figure 2); the control panel includes a set up wizard that checks the whole system and makes sure that it is it ready to go. The only manual adjustment needed is to calibrate the first layer. If the extruder nozzle is too close to the print bed the filament will not flow properly and if the nozzle is too far away the filament will not be pressed down onto the bed and the print will come adrift. There is a built in procedure for this and it is not difficult to find a happy medium.
The printer has proved to be fairly simple to use and reliable. Like all equipment it does need some maintenance, the first layer occasionally needs fine tuning, the print bed must be kept clean and the extrusion nozzle can get blocked with charred filament. The Prusa website has an excellent knowledge base to help you get over these and any other problems you might experience. They also have an entertaining YouTube channel with product announcements and instructional videos. Prusa printers are “open source” and use standard open market components where ever possible so spares are easy to obtain.
So far I have experimented with two different printing filaments, PLA and PETg. PLA is the filament most commonly used, it has a relatively low melting point, is odourless and prints without stringing. It can be drilled, filed, sanded to a fine finish and glues with normal plastic welding solvent, it is not very strong and not suitable for fine details like hand rails or glazing bars. PETg, basically the plastic used for pop bottles, is much stronger and is used for tools and equipment (the plastic parts of the printer are printed in PETg). It is, however, prone to stringing and has to be cleaned up before use, it does not take well to being filed and sanded and I have yet to find a glue that works well on it. There are many other filaments available, mostly for different types of specialist applications.
The hardest aspect of 3D printing to learn is how to adapt 3D designs to make best use of the printer. It is very easy to get carried away at first and produce a perfect miniature of the object to be printed, this will probably not work very well.
Firstly, FDM printers work by sticking down molten filament to a flat steel sheet and then building up the model, layer by layer. They work best with objects that are flat on one side; more complex shapes can be cut during the slicing process, printed in two halves and then glued together but it can be difficult to achieve accurate registration of the two parts.
Secondly, the minimum wall thickness that can be printed is just over twice the nozzle diameter (0.86mm for a 0.4mm nozzle), this effects the level of detail that be printed for things like bolt heads or gussets.
Thirdly, if a new layer is started that is wider than the previous one by more than the width of the extrusion (known as bridging) the printer will be trying to stick the filament to thin air and problems can arise. The slicer software can add supports in the form of a mesh scaffolding to hold up big overhangs and these can be cut away after printing. This works well with larger solid objects but less well with very thin or delicate prints that are easily damaged when removing the support material.
So, what can you make with a 3D printer? The answer is, subject to the three provisos mentioned above, anything that you can think of that will fit within the printer’s envelope.
I have successfully designed and printed numerous household objects including; storage boxes, tools, tool handles, sewing accessories, brackets, replacement parts and, most importantly, novelty cookie cutters for the grandchildren. My model making has mainly been focussed on buildings for my home micro layout and larger club layout. It’s been brickwork, doors, windows, skylights. ladders, railings, downpipes, architectural mouldings and so on. Be warned, in the case of 3D brickwork, each individual brick has 5 faces and 8 vertices (corners) above the backing layer so a 200mm square panel contains an awful lot of these and not all CAD software can cope with the number crunching involved.
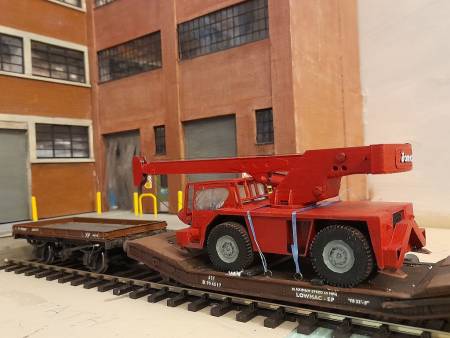 Figure 3
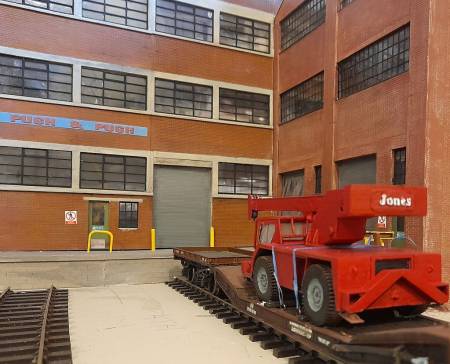 Figure 4
Figures 3 and 4 show one end of my (incomplete) home shunting plank. The factory buildings are made from 5mm foam board overlaid with 3d printed brickwork, doors and windows. The Jones Iron Fairy crane was drawn up from information I found on the internet. As you can see I had trouble with the cab. Modern vehicles have quite thin door and windscreen pillars which, if drawn and printed to scale, are very flimsy. I tried several different ways of printing it and ended up having to use cyanoacrylate glue to assemble it and ruined the glazing in the process. There is a solution to this problem but I do not know what it is yet. The Lowmac EP is Skytrex ready to run with added brake gear and proper lashing rings and the reach wagon is an unmodified Slater’s Lowfit kit.
To summarise; the Prusa Mk3s kit is every bit as good as the reviews said it would be. It is well thought out in every aspect, quite easy to assemble and use and the on-going support from Prusa Research is exemplary. Owning a good quality 3D printer has certainly opened up a whole new world of possibilities as far as railway modelling is concerned.
Design Software:
I use TurboCad for most of my 3D design work, it may not be the best program available but it is the one that I am used to (I have been using it since the pre-internet days when it was a 2D only program distributed as a box of floppy discs). TurboCad is very good for 2D design and fairly good for 3D work. Like any complex program it takes a bit of learning and I am still occasionally learning new procedures. A useful feature of the program is that it allows image files to be inserted into a drawing; in the case of the Iron Fairy I inserted a general arrangement drawing and carefully resized it until was exactly to scale in both the X and Y axis. The individual parts can then be drawn by tracing over the GA drawing and then copied and pasted into a new drawing for detailing and eventual exporting in a printable format. Starting all the individual parts in the master drawings ensures that they fit together correctly particularly when complex profiles are involved. Once completed the drawing can be exported in stl (stereo lithography) format for printing.
Preparation for print:
Prusa Slicer is bundled with the printer, this program translates the object stl file into G code that instructs the printer how to make the object. It does this by slicing the object into thin layers, these layers are then printed out, one on top of the other to create the object. The program comes with numerous pre-sets for different nozzle diameters, type of filament and print quality (speed v’s detail), these all work very well and it is rarely necessary to adjust them. Prusa are continually developing the Slicer and updates come out regularly with useful additional features. The last one, for instance, enables selected top surfaces to be printed with a smooth finish.
Other sources of printable designs:
A quick internet search for “free stl files” unearthed more than 20 different websites from which printable files can be downloaded. Of these the best is generally thought to be Thingiverse, which has thousands of different printable object files that can be downloaded for free. These include many useful tools and gadgets and a good selection of items of interest to railway modellers ranging in scale from N to S.
The Slicer software allows objects to be resized so models could be printed in your chosen scale irrespective of their original scale as long as you take care that the details are not smaller than the minimum resolution of the printer as described above.
Many 3D design programs can import and edit stl files so you can adjust download object files to suit you own modelling needs.
It is worth remembering that you do not have to own your own 3D printer to be able to have your own 3D designs printed out. There are now 3D printing bureaus that can realise your designs in a variety of different materials and websites such as Shapeways that host your designs and enable you to sell prints to other modellers.
