DMR J17 GE 3500 gal tender suspension
Prepared by: Tommy Day
Originator: Steven Rowe
Steven Rowe - Aug 28, 2018 at 5:23 AM
I am about to start a J17 and thought I would make the tender first.
The kit looks nice and the instruction look good too.
Decided to read through a couple of times so I can comprehend what needs to be done.
First job is to make the tender chassis sub assembly which can be built rigid or compensated.
Whilst I haven't made the decision either way I want to know what to do..
There are two methods of compensation shown and both have the first axle fixed.
Method 1 uses two rocking beams with bearings in them and a cross shaft as per photo below.
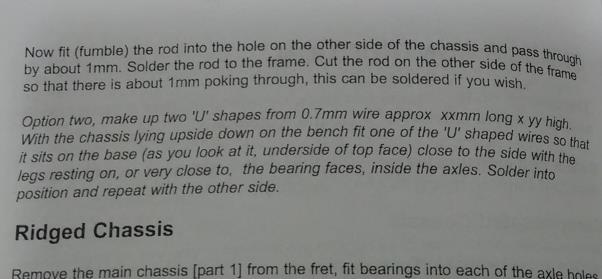
The second method has no image but text, non of which I understand.
Perhaps someone can enlighten my obtuse brain so I can then make an informed decision.
Jim Snowdon - Aug 28, 2018 at 6:56 AM\
Steve,
Option 1 is not a full compensation system, as with the front axle fixed in the frame, the result is a four point suspension. It can only cope with irregularities in the track that are in both rails at the same point. Show it any twist in the track, as in a step in one rail, and it will rock, just as will a four legged table.
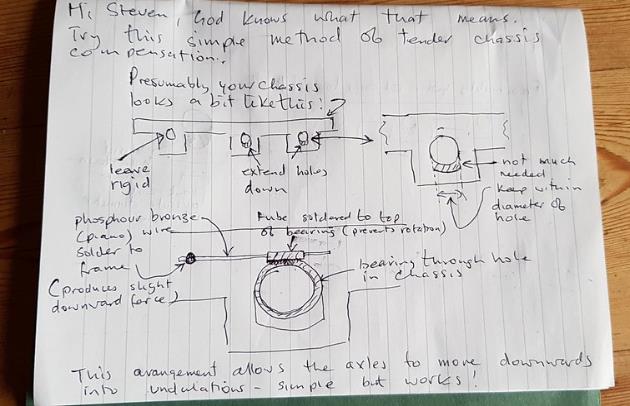
Option two is a basic form of springing, although the text is providing ample evidence of why a diagram is so much better. Ignoring the U-shape reference for a moment, all it is doing is supporting the four axleboxes on lengths of spring (piano) wire. I suspect that the bit about making the wires U-shape is so that they are hidden behind the frames, rather than being visible through the holes in the outer frames.
Jim
Nick Dunhill - Aug 28, 2018 at 8:14 AM

Jim Snowdon - Aug 28, 2018 at 9:10 AM
Thanks, Nick. The picture that does justice to my few words (and much clearer as well). :)
Jim
Nick Dunhill - Aug 28, 2018 at 9:26 AM
Pleasure. The rudeness referred to the text in the instructions Jim, not your description.
It might have even been you that suggested this method to me in the first place!
Steven Rowe - Aug 28, 2018 at 10:45 AM
Nick
Many thanks. I can never EVER fathom why people write instructions like this when even the addition of a simple image like you do would make it so much easier.
Soldering the brass tube to the inside of the bearing seems a bit risky as i may end up with the bearing soldered to the frame.
Perhaps I should put some greaseproof paper over the bearing against the inside of the frame before attempting to solder the tube across the top.
Regards Steve
Nick Dunhill - Aug 28, 2018 at 10:59 AM
Hi Steve
Put oil on your chassis round the bearing and you'll not have a problem soldering the tube to the bearing.
Nick
Steven Rowe - Aug 28, 2018 at 11:04 AM
Thanks Nick
I think after this kit I will start on the Finney kits I have, the A4,A3 and V2.
My train wreck Ace C1 migght end up with Dai Woodham.
Regards Steven
Nick Dunhill - Aug 28, 2018 at 11:34 AM
Nah. Press on, you might surprise yourself.
Nick Dunhill - Aug 28, 2018 at 11:48 AM
You'll get a heap of satisfaction from making something out of nothing (See comments above) but you'll need a thin sheet of nickel silver or brass and a piercing saw.
Steven Rowe - Aug 28, 2018 at 10:18 PM
I was always so inspired by those dim dark austere days of the Rev Peter Denny, in the vicarage kitchen with an old oil tin, tin smips a soldering iron you heated in the gas rink.
Simply to scratch build a loco amazes me..
Having said that my C1 gives me a clue of what its like..
I should have actually approached the kit with the philosphy that im scratchbuilding a C1 and I could use some of the parts.The instructions could be used to light my wood heater.
Ian - Aug 28, 2018 at 10:44 PM
I learned to solder using an iron heated in the fire, no gas where I lived, stick solder, tin from old cans, copper pipe and Bakers fluid flux. My first loco model used brass from curtain rails for the frames, tinplate from cocoa tin cut with my mother’s dressmaking scissors, still got the bruise!, and a bit of copper pipe for the boiler. I learned that the two essentials for a good solder joint is plenty of heat and plenty of flux! Still holds good today even though I now use a temperature controlled iron and Powerflo flux.
Ian.
Steven Rowe - Aug 28, 2018 at 11:24 PM
My temp control iron needs replacing.
I now use irons from the hardware store like a swithable 30/60 watt job.
Sometimes i find on a big piece of brass if the iron isnt powerful the brass gets hot but still not hot enough for the solder to flow.
I gave up on those rip off bottles of Carrs like it is some magic holy water.
Now I buy phosphoric acid and dilute it down.


