Finney LNER V2
Prepared by Tommy Day
Originator D. Littlewood
Thread and Forum Title Finney V2
Thread start date May 4, 2017
For full Forum thread click here : - Forum article
| Failed to open database: gaugegu1_gog2 | ret is false |
At Telford in 2014 I was lucky enough to get what I believe was MF's last V2 kit (and also the last Duchess). I have been looking forward to getting started on one of them, but other things got in the way. Still, a couple of weeks ago, I made a start on the V2. As is my habit, I commenced with the tender - always useful IMO to get a feel for the kit designer's practices and the general quality of the parts. I've made an LNER 4200 gal group standard tender before (Gladiator) which had some issues. My first impressions of this one was it was a very high class product; the etches were excellent and the tab/slot fit was spot on - no having to dig out the slot with the back of a scalpel blade on this one! However, it was not without a few issues. The first of these concerned the brass bushes supplied. The design has the front axle in fixed bearings, and the rear two are compensated, with the axles floating in a fold-up part of the chassis. This can be seen in the photo below:
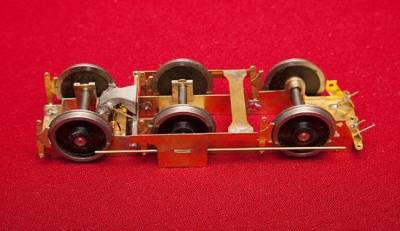 The problem was that the bushes supplied had flanges which were way over thickness; the width over there outsides was about 31.5 mm. Stupidly, I didn't check before soldering them in place (very remiss of me, as it's happened to me before!) so I had to spend 20-30 minutes filing them down. I left them with virtually zero play. I put two of the supplied etched washers on each side of the rear axle (also almost no play) and none on the middle one, which seems to leave adequate side play to pass through a Peco point without problems. I was uncertain how to position the brake shoes, as the wheels had a fair amount of free vertical movement (apart from the front ones) but as their contact, or lack of it, with the wheels is not visible once the frames are in place I erred on the side of caution. I think it might be tricky to replace and remove the wheels once all the parts are fitted.
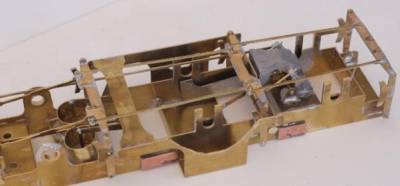
This is the position I have reached with the chassis so far:
 I used the special 5/32“ axle wheelsets Slaters supply for Finney kits. It might have been nice if the instructions had mentioned that the axle extensions needed to be removed before I made the wheels/axles hard to remove… Indeed, a general comment I would make is that the instructions are rather sparing in detail; this is clearly not a kit for the beginner, but it would still be nice to have things made a little clearer.
I still have the brake gear and the water scoop actuating rods to do, but I have left those until later in case I need to do any modifications which might put their delicate nature at risk. The scoop itself is an intricate structure, far more detailed than others I have seen.
Next I made a start on the frames. These are beautifully built up with several delicate overlay parts I used my RSU and solder cream to attach these, and I hate to think how difficult the cleaning up would be if I had tried conventional soldering.
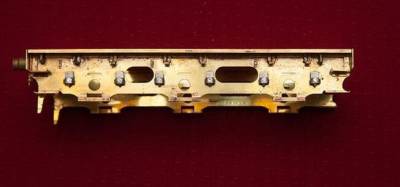
The axleboxes/springs are each a composite of 4 whitemetal castings: the two spring suspension brackets shown either side of each axle hole above, and an axlebox and leaf spring for each wheel. I have hit a snag here; I did not feel it would be easy to Araldite all these parts in place at one go, so I decided to fix the brackets in place first. I have now discovered that it is difficult if not impossible to force spring/axlebox castings into place, and fear I have damaged a couple of the spring hangers in trying. I will put up some photos later.
This is the current state of play. I hope to make a start on the body this weekend.
 David
David
DavidAtkinson4172 - May 5, 2017 at 1:00 AM David Firstly I have never made a Finney V2 but some manufacturer's kits require the axle bushes to be fitted with the shoulder on the INSIDE. Could this be the reason? I know it is contrary to common logic but it is just a thought. David A
DavidL - May 5, 2017 at 12:27 PM David, Yes, the same thought occurred to me - but the extension each side doing that would be 3 mm, giving an overall width of 33 mm, even worse than the conventional way. David
Stelfox22047 - May 6, 2017 at 9:05 AM I found the same problem with the A4. It should be remembered that these kits are a quite old design. (The A4 assembly diagrams are dated 1995) So I would expect that the suppliers of the nuts & bolts may well have changed over the past 20+ years. I skimmed mine in the lathe before fitting. The quality is excellent but I found some of the advice in the instructions 'dated' compared to say, the latest MOK kits. Malcolm
Tony Geary - May 6, 2017 at 12:58 PM
I had a quick look at mine David, and I have washers spacing out the fixed axle. I also carved out a section of outrigger so that the wheels could be painted separately. I like to be able to get them out - maybe I could made the brakes and outrigger removable.. I also made up some rudimentary brake cylinders to replace the etched silhouette.
I know the instructions are being re-written, and hopefully they will be available on line - that might be a help. I see the V2 is scheduled for re-release by Finney7 soon..
 Regards
Tony
DavidL - May 6, 2017 at 7:20 PM (Jim), The bushes in the loco kit do indeed appear to be identical to those with the tender. I will make a note to myself in the loco instructions to check the flanges before soldering them in place - so much easier to trim them in the lathe. Malcolm, Indeed, as I said, the instructions are very sparing of detail; one area I would certainly recommend the Finney 7 team could improve. Tony, I do like your idea of the brake cylinders, indeed I wonder why MF didn't include them. Oddly enough, I turned up a Duchess brake cylinder in solid brass for a friend last week after it had come off worst in a dispute with a soldering iron. I see you added a new cross member to fix yours to, I assume it caused no problems with the various actuating rods. Thanks to all for their comments and advice. David
Richard Lambert - May 6, 2017 at 10:20 PM If you have a look at our website (Finney 7), you will find that all the instructions have been very significantly improved . All the instructions for the kits we have released are on-line, and we are finalising the V2 and tender at the moment. As soon as it is signed off, it will be put on-line. Richard
DavidL - May 6, 2017 at 11:09 PM Thank you Richard; I will keep a look out for the revised instructions. David
Tony Geary - May 7, 2017 at 11:25 PM Also, you might have noticed that I made 2 equalising beams close to the inner frames that pivot independently on the same shaft. I find that more stable than the Robin Reliant style 3 point compensation. Just my preference… Regards Tony
DLOS - May 8, 2017 at 8:40 AM In the days when I used to compensate vehicles, I have done the same on occasions but, if I understand you correctly, this is not true compensation as you now have a four-legged stool (rather than the required three-legged for full compensation). David
Tony Geary - May 9, 2017 at 7:42 AM Correct David! But it works for me, it just keeps as many wheels in contact with the rail as possible. I've found that 3 point compensation vehicles tip too easily into the front headlight corners - if you'll excuse the comparison.. Sorry to hijack your thread David L
DavidL - May 9, 2017 at 11:30 AM No worries, Tony. These discussions often throw up peripheral matters, sometimes more interesting than the original topic… David
DavidL - Dec 4, 2017 at 11:31 PM
Pretty slow progress on this; I took something of a break while other things intervened. However, I have done a little further work on the tender. First, I dealt with the springs issue. I described above how the need for the kit meant that the castings were in two parts, and that sticking the brackets on first made it very difficult to get the rest of the springs in place. In the end, as I had cut some of the hangers a little short, I ditched the kit castings and replaced them with some very kindly donated by my friend Joe. These went in place quite easily.
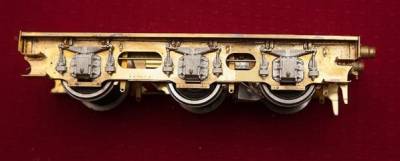 I have made a start on the rather intricate brake gear, more later.
David
DavidL - Dec 5, 2017 at 12:07 AM As a change from the complexities of the brake gear, I made a start on the tender body. First impressions are that, compared with the equivalent Gladiator 6-wheel LNER tender, it is quite a bit more complex. The sides have an upper plate which has to be soldered in place before the assembly; this is an ideal case for using an RSU. I have shown these pictures elsewhere, but to give full coverage here:
As the steel base plate sucked the heat out, I inserted a piece of thin card just where the soldering was to be done:
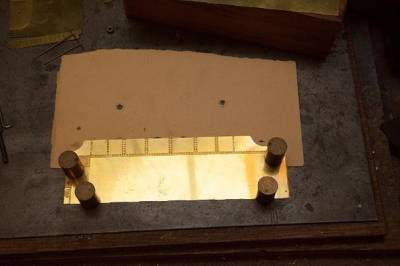
This was the result before cleaning up:
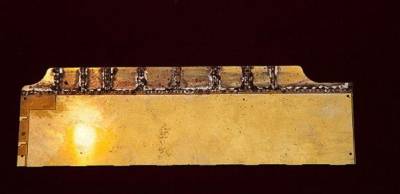 ….and this after:
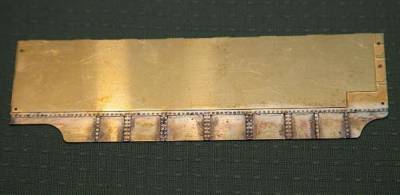 I described some thoughts on cleaning up this type of job in a separate thread in “Hints and Tips”.
David
DavidL - Dec 5, 2017 at 12:31 PM
Simon, I had already downloaded the new instructions (Finney 7). They are quite a bit better than the original ones. The latter were not bad, though neither set gives clear guidance on some fiddly points. I guess these are kits for more experienced builders, and we should (and I do) enjoy the challenge. I don't mind a challenge in making a complex and intricate product, though I do find it irritating to have to correct actual faults. David
DavidL - Dec 5, 2017 at 1:27 PM
The tender rear also has an upper part to be soldered on, though this was a good deal less intricate, and thus easier.
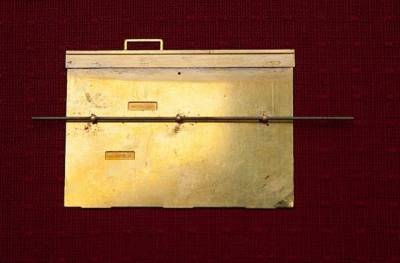
The handrail knobs were held aligned with a piece of wire and soldered from the rear. I always use piano wire for the handrails, as I have a strong aversion to the sagging things one sees all too often on models. I will trim a piece of wire to suit and fix in place with Loctite, as I described some time ago on the old forum. A test run of fixing the sides and rear in the base suggests that the tabs and slots are very well done. A little more work needed on the rear (footsteps) and sides (door hinges and cab handrails) before I tackle that though. David
DavidL - Dec 5, 2017 at 5:11 PM
I have now attached the door hinges to the side plates.
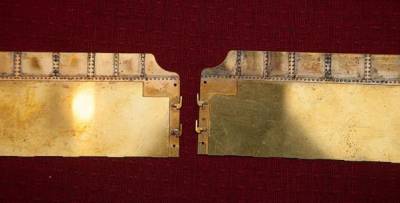 I used my RSU for this, which underlined for me two things I find to be problematical with the device as currently constituted. Firstly, when trying to fix a very small part in a precise position and orientation by application of the manual probe, it is almost impossible not to nudge the part out of position or alignment. Applying the probe to the larger base piece is sometimes helpful, but not always; as the solder (or the flux) melts, surface tension often pulls it adrift anyway. Secondly, it is especially annoying, just when you have the thing held down in[I] exactly[/I] the right place, to push the switch and find nothing happens. The carbon rod probes seem to glaze over frequently, and this glaze seems to be a good insulator; the tip needs to be refreshed (in the manner of sharpening a pencil) before it will work properly.
I have some ideas on how to improve this situation, which I will report on in Hints & Tips (if they work!). David
Raymond Walley - Dec 5, 2017 at 5:50 PM I have a desk pencil sharpener to keep the point in shape but simply use a file to take the 'glaze' off between re sharpening but a file would do the job anyway. I use magnets to hold as much as possible in place and for very small parts use a scalpel to hold it in place while the main part is held by the magnets, works every time. The key is keeping the probe clean and pointed unless doing a seam in which cast it needs flattening off so that it touches both surfaces and lets solder run. I hope that helps, it is such a usefull piece of kit, it is worth the effort to master it's idiosyncrasies.
DavidL - Dec 5, 2017 at 6:12 PM Raymond, Thanks. I have tried holding the part in place (using, in my case, a biologist's dissecting pin - effectively a pin on a stick) which does sometimes help, but not always. I agree it is a most useful tool; there are some jobs which would be so much more difficult to do any other way. And yes, I know the tip must be kept clean, it's just that one doesn't always remember to check it every time, at least I don't! David
StephDale - Dec 5, 2017 at 10:16 PM What's the 'glaze' you're referring to guys? Flux? I can't say it's a problem I've come across in many years of use. For small parts I use the probe to hold in place with no problems. It's also perhaps worth me mentioning that I don't use a heavy work block, just aluminium foil or solder the return wire into the model. So I don't get any significant heat sinking problems. Just horses for courses I guess. Steph
Thompson22307 - Dec 6, 2017 at 8:45 AM David, can you PM me your observations? We have an review and ammendment system for the instructions; like any instructional document they are living documents that can be changed to correct, clarify and add new information. Thanks Simon PS I use pointed stainless steel tweezers to hold little bits in place and don't use a large metal plate.
End of thread.


